Defect Management
TestAssure’s Defect Management System is used to link, communicate and keep track of any defects, change requests, requirement changes and core issues. Access is controlled by the Defect Manager role (see User Management for more information).
Creating a Defect
Defects can be created from 3 places:
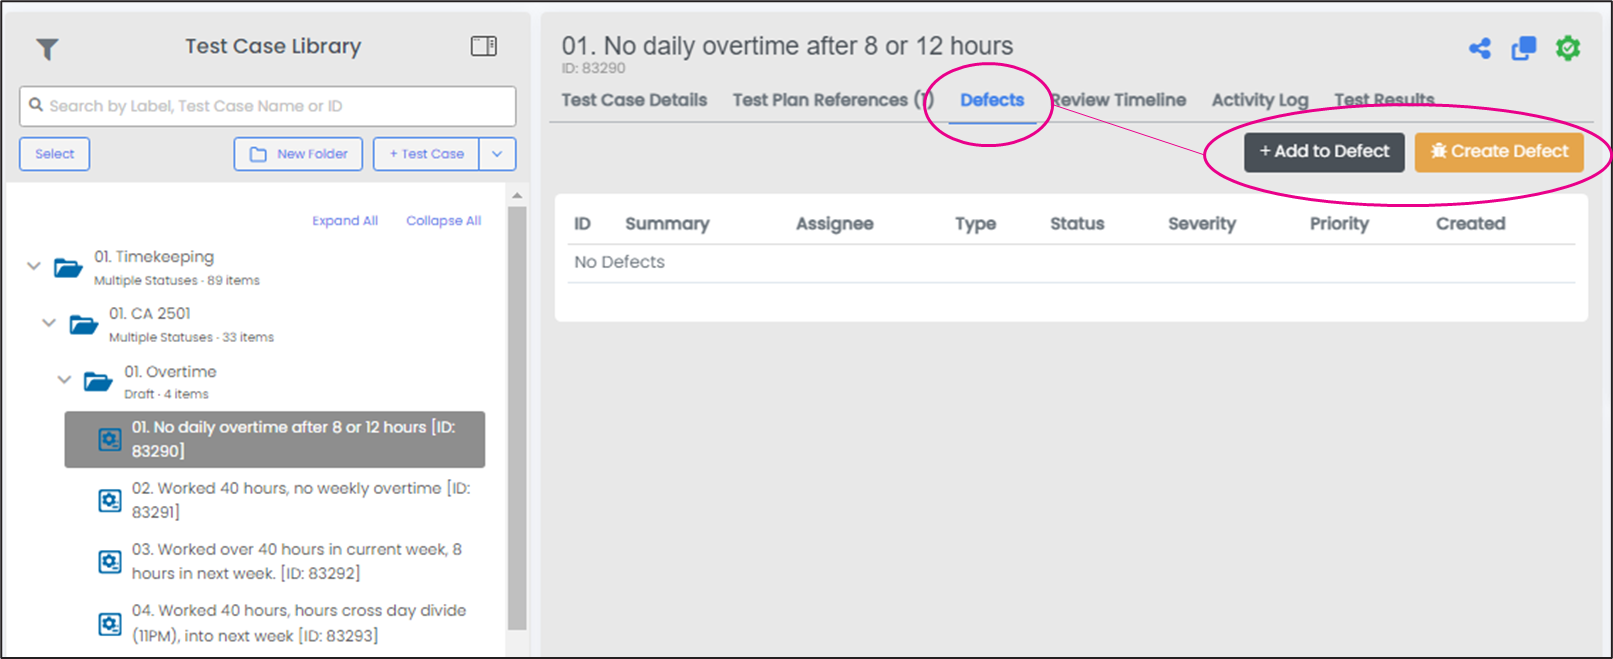
- The Test Case Library > Defects tab: From here, a test case can be associated to a new or existing defect.

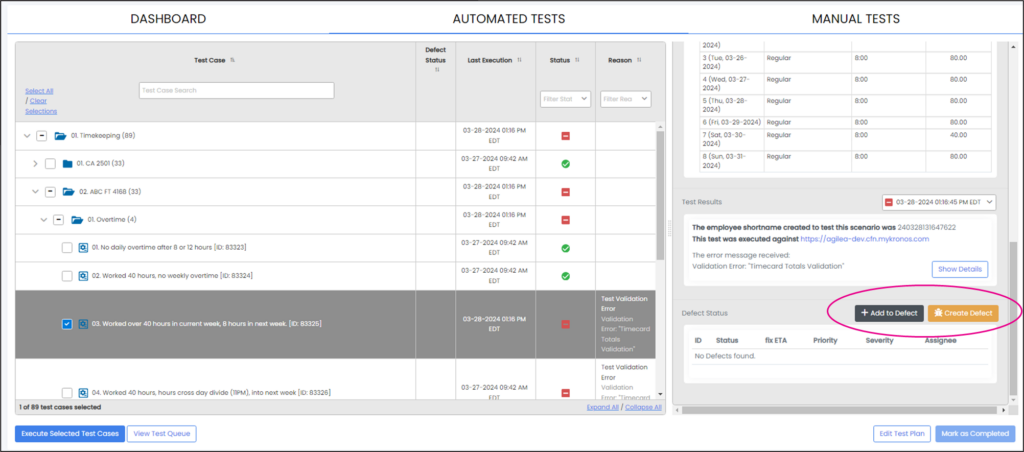
- The Test Plan > Execution Details: The scenario and test plan execution will be directly linked to the defect.

- The Defects screen: This is where all the defects are managed. Scenarios created here are not associated to any tests, which must be done manually after creating the defect.

Creating a Defect – Fields
The following fields are available in the Create Defect popup:
- Defect ID, Created, Updated, Reporter are automatically populated after defect is saved.
- Status is defaulted to New. This can be changed after defect is saved. Other values include In Progress, Assigned, Ready for Retest, Resolved, Blocked, Closed, Closed Not Needed.
- Issue Type: the following classifications are available:
- Defect: any incorrect result or unexpected behavior from a product.
- Change Request: a modification to the original project scope.
- New Requirement: an addition to the original project scope.
- Changed Requirement: an update or modification to the project’s initial requirement.
- Core Issue: an issue specific to the WFM or HCM solution that prevents configuration of project’s requirements.
- Priority: Urgent, High, Medium, Low.
- Severity: Showstopper, Serious, Moderate, Minor.
- Link Defects: Allows you to link the defect to an existing defect. You can search by the Defect ID or title.
- Defect Title: (required) Description of the defect.
- Replication Steps: (required) The steps to reproduce the defect.
- Root Cause: Description of what caused the defect. This field becomes required when the Status is changed to Ready to Retest.
- Reference ID: free form field used to reference an external test ID.
- Product Issue: free form field used to reference external IDs such as a KGS ticket or PAR #.
- Target Fix Date: estimated date by when the defect will be resolved.
- Entitlement: The module or product area the defect is related to.
- Assignee: The user assigned to the defect.
- Defect Watchers: The user(s) who want to be notified of updates to the defect.
- Attachments: Allows users to upload screenshots or other attachments related to the defect.
At minimum, when creating a defect, the user needs to fill in the Title and Replication Steps. The user will not be able to save the defect if these two fields are left blank.
Additional Features
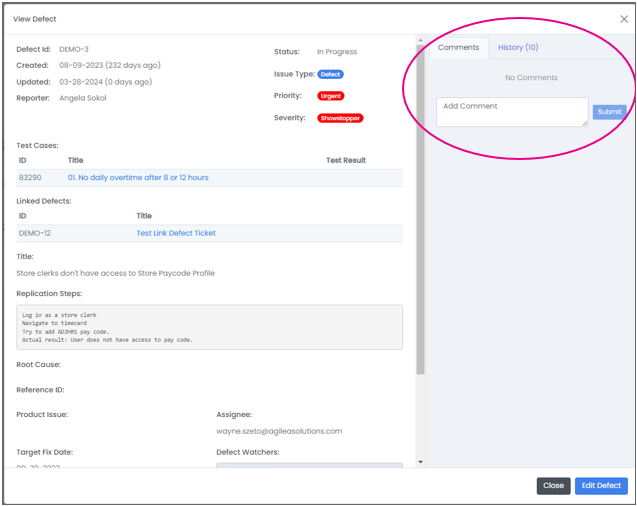
Users can add additional context to defects via comments. To add a comment, simply open the defect and use the Comments tab.
The History tab tracks all changes made to the defect, by whom and timestamp of change.

Editing a Defect
To edit a defect, simply open the defect and click on Edit Defect.
Closing a Defect
A defect can be closed by updating the status to Resolved, Closed, or Closed Not Needed:
- Resolved: Indicates that the defect has been fixed and tested.
- Closed: Indicates that the defect is working as designed.
- Closed Not Needed: Indicates that the defect has been rejected.
Adding a Test to an Existing Defect
Test cases or test executions can be linked to existing defects using the “+Add to Defect” button.
To link a test case, open the test case in the Test Cases screen, and click on Defects tab. From there, click on “+Add to Defect” button. Search by the Defect ID or Title to link the test case to, and click “Link to Defect.”
Similarly, to link a test case execution, navigate to the test execution in Test Plan, and use the “+Add to Defect” button to search and link to defect.
Email Notifications
Users are notified of defect updates via email. The three types of users that may get a notification are:
- Reporter: The user who created the defect.
- Assignee: The user assigned to the defect.
- Watcher: User(s) added to receive notifications of any updates to defect.
A user can have multiple roles. Example: I can be a reporter and be assigned to the defect. If a user is not one of these three roles, they will not receive notifications on the defect.
Note: The frequency of email notifications is controlled by the Email Notification Delivery field in your profile. You can navigate to your profile by clicking your name in the top right.
- Daily: Sends one summary email at 6PM EST summarizing all defect updates.
- Immediately: Sends an email notification every 15 mins. of all defect updates made within that interval.
Defects Screen
The Defect screen is where defects are be managed. It allows you to sort by the column headers, and filters by Test Suite, Assignee, Type, Status, Severity, and Priority.
The Test Suite field is automatically populated if the defect was created from the Test Case Library or Test Plan screens.
Export CSV: This button exports all the defect details (excluding comments, history, and attachments) to a CSV file.